Sunday, December 29, 2013

Christmas Quilts

I've finally gotten over my 2-month "block"of not feeling much like sewing and I'm back to multiple projects--LOL! First, I'm making Bonnie Hunter's annual mystery quilt which started on Thanksgiving. I'm proud of myself for keeping up with every week's 'clue' but have to come clean: After making Bonnie's wonderful scrap quilts for 2 years now, I've learned my lesson! I'm making a very small quilt--half the size of Bonnie's 'small' quilt. My colors are different than hers too: aqua, lime, lilac and yellow/gold (although it looks orange here).


And. . . I started another project too *sigh*
Every year since I've been quilting, round about November, all I want to do is make Christmas quilts and every year I'm just SURE I'm going to want to make nothing but Christmas quilts ALL year. By about mid-February, I'm on to spring florals--SO, I have to get going on this adorable "Deck the Halls" quilt! 


I'm going to make it smaller than the pattern to fit on my foyer wall so I'm making 2 of these units and 3 of the applique units and reducing the size of everything. Instead of 3" finished half-square triangles, mine will be 2 1/2" and the wool applique candies and gingerbread men will be 2/3 their size. It will end up about 38" x 45".

Wonder if there's any other Christmas quilts to see on Judy's blog for Design Wall Monday!

Wednesday, December 18, 2013

Ahoy, It's A Boy!

It's been ages since I've posted but life has been tempting me with things other than quilting! My husband is retired now and travel seems to take up a lot of our time--no, I'm NOT complaining--LOL!

My daughter's best friend is expecting her second child on Christmas day and I wanted to make a quilt for her as I did for her adorable first child. Here's the cute story: It's a boy and they've named him Pierce. She promised her husband if he'd agree to have a THIRD child, (yes, she loves parenthood that much!) she would let her husband get a boat. Thus the theme of little Pierce's bedroom: Ahoy, it's a boy. Here's my rendition in quilt form--Minkee on back, of course!


Sunday, June 16, 2013

A Finished Top!

Remember the Wagon Wheels blocks I made a couple of weeks ago in a Sandy Klop class? I decided 4 would be enough what with sashing, a first border, a piano keys second border and another plain border. (I'm loving that red!) This finished 44" square and is the perfect size for the wall quilt rack in my foyer. AND, since this week commemorates the 150th anniversary of the Battle of Gettysburg, the Civil War reproduction fabrics I used are appropriate. I was able to show this top to my Civil War-buff husband on Father's Day, promising him I would finish quilting it within a couple of weeks. 

Here's the quilt I just hung in my foyer rack: the block exchange I did with my quilting group, the Calendar Girls, at the end of last year. Really gets me in the spirit for the 4th of July!

Did you post your week's efforts on Judy's Design Wall Monday?

Monday, June 10, 2013

McCloud Retreat!

Every year by best quilting buddies and I go to northern California for a retreat in the pines in the tiny, historic town of McCloud. There we stay in a 100+ year old building with an inn (and huge classroom) on the top floor and shops and restaurants on the main floor fronted by a wide porch with benches and flowerboxes. It's pretty much the same as it's been for decades except for the upgraded rooms at the inn. Along with the wavy glass in the extra tall windows and antique-looking fixtures, the bathrooms and beds are pristine and plush and the reproduction wallpaper (including William Morris designs!)--Delightful!

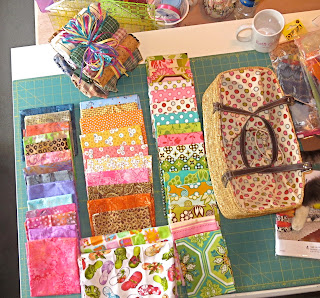
I vowed not to buy any fabric even though we stopped at 2 quilt shops on the way. I have more than my sewing room can tolerate as it is! but we had a vendor at the retreat with really good prices on really nice fabric and since my batik and 30s stash is pretty meager, I purchased 5 yards in 1/2-yard pieces (middle row in the photo). Then we played a hand of "Batik Poker". There were 15 of us taking part so 5 of us tossed a fat quarter of batik into the pot and drew a card. Highest card won all 5. I won with a King! This was repeated with 2 other groups of 5. At the end there were 3 of us with 5 fat quarters each. All 3 of us set our winnings on the table for an all-or-nothing draw of a card! First card was a 9, next card was a King, my card was. . . an ACE!!! I won all the fat quarters!! There they are along the left side of this photo.

Then we had an Auction with all proceeds going to the American Cancer Society. There were about a dozen wonderful prizes on display at each of us could bid on. Where do the prizes come from? They're donated by us quilters, of course. There were big baskets of yummy foods, fancy bags of fabric, home and yard decorations, anything you could think of! I had my eye on the fat quarter tower that came in a delightful basket-purse and ended up the high bidder!! (Its on the upper right in the photo next to the column of fabric that came inside it). I also bid on a basket full of wonderful Sunsweet items donated by a lady who runs the Sunsweet Growers Store in Yuba City, CA. It's the best gift shop I know and I use their shipping service every year to send delicious and useful items to loved ones at Christmas.

So all totaled, 13.5 yards of fabric!! I should be ashamed of myself. . . 

 I figure I sat at my sewing machine for about 28 hours from Friday afternoon until Sunday at noon. WELL--a girl's gotta EAT! I brought 4 projects to work on but only ended up doing two: an apron from a darling pattern I found, and the 1st and 2nd months in the BOM I'm starting (a Nancy Rink pattern through ThimbleCreek Quilt Shop in Concord CA) and a paper-pieced pattern I've been putzing with for a couple of years. 


I started with the BOM because the quilt has 68 fairly intricate blocks and this BOM is only 6 months! Yeah. . . do the math! I spent the first 13 hours making the blocks you see on my design wall. That's all of month one and 1/3 of month 2. But if you see the finished quilt you'll know why I couldn't resist!


Next I made "My Neighbor's Apron", a pull-over-your-head apron sort of like a smock and just adorable! Well, that left not too many hours to sew. I did a little paper-piecing on an on-going project the rest of the time. 

Aren't retreats the greatest?! Why not sign up for one yourself? And take a look at Judy's Design Wall Monday while you're at it!


Sunday, June 2, 2013

Wagon Wheels

I took a wonderful class last Saturday with Sandy Klop of American Jane! A more delightful speaker/teacher you'll never meet! I know you've all seen her charming and fun designs full of nostalgic 50s and 60s kids and animals with the bright colors of that day reproduced.

Sandy spoke to our guild the night before the class giving us the story of her journey of becoming the beloved quilter she is today. She showed probably 40 of her colorful quilts--EACH and EVERY ONE of which I LOVED!! Take a look at her blog and the American Jane pattern and book page.

Anyway, the pattern we made was Wagon Wheels, a 15" block that's a mostly paper-pieced design. This photo shows her fabrics but I had this Fat Eighth bundle of Barbara Brackman's "Metropolitan Fair" line (which I fell in love with several months ago) and felt this pattern was perfect for it. I also changed it to be totally scrappy (my blocks are below) which I really like.There are 57 pieces in each block and curved piecing so I was only able to make 2 1/2 blocks in the class. But I continued for another couple of hours when I got home and ended up with 4. I plan to make 9 total.


I'm off on a 3-day quilting retreat to the Mt. Shasta area so will have time to make more of these blocks. I'm also bringing 4 other projects along so I can bounce around as the mood strikes. Should have a lot to show at next week's Design Wall Monday!

Sunday, May 19, 2013

Two Tops and Three Tops-


Two tops--My quilting group, The Calendar Girls, got together all day Saturday and sewed quilts for community service. We'd independently been making 9" blocks for a couple of months in two color-ways, red, white and blue and batik and white. We had a little contest to guess how many total blocks would be turned in to make the quilts and I was overwhelmed with the total: 141 blocks were made by the 15 people in the group! No one came close to guessing that many. After 7 hours, we had 6 tops made! Here are 2 of them, before borders.


Three tops--
Remember that duct tape dress form class I took a couple of weeks ago? I put it to good use this last week and had a great time making 3 tops that I LOVE! The white one with the red and pink border is made from a vintage linen tablecloth from the 50s. The blue one is the same Simplicity pattern made of a flowy rayon. The other is a gauzy fabric with a Butterick pattern that wasn't so easy to work with but I Frenched all the seams and it will be nice and cool in our 100+ degree summer.
 So, did you post to Judy's Design Wall Monday today?

Monday, May 13, 2013

Round Robin--FINISHED!

Is there a better feeling than completely finishing a quilt? I finally had time to finish the round robin quilt I made in a series of classes at Thimble Creek, that wonderful quilt shop in Concord, CA. We started with a center block of our choice and had four more rounds. I was inspired by Freddy Moran's love of "brights with black and white"so that's what I made for the center. I also told everyone that I wanted this quilt to be small so I could hang it in our foyer. Boy, did everyone come through! the first two borders were made by the quilt shop's owners, Roxie and Joe Wood--aren't they cute?! The third border, sorry to say, was made by one of the other talented round robin-ers whose name I can't remember--sorry! At that point, I was ready to say that I didn't want a fourth border I loved it so much as it was but Sandy Klop (of American Jane fame) said, "Oh, I know what I'd do with it!" Tell me, would you say 'no' to having sweet, wonderful Sandy add something fun to your quilt? Me either!! And look at the adorable 'twister' blocks she added for the perfect finish!

I love my round robin quilt! It measures 41" square, perfect! And I quilted it really nicely with little circles in the yellow border and following the peaks in the colored points and making flowers in the colored squares all using variegated thread. I certainly do have an easier time completing smaller quilts. I tell myself over and over to just do small projects. Hasn't worked very well.

Get over to Judy's design wall Monday post and see what other clever people have finished!

Sunday, May 5, 2013

Duct Tape Dress Form

Two things to show you this week: the "colorful" duct tape dress form I made in a group class and my finished "words" quilt top.

I used to make lots of clothes, way back when I was in jr. high and high school especially when Home Ec was still an important part of the curriculum. I'd always wanted a dress form and I finally got one about 15 years ago. Dress forms are made to be shaped to fit you with wheels and cogs you turn until the measurements are the same as yours, You can also elongate or shorten upper and lower torso. But there are essential measurements that have to be padded and shaped that are much tougher to do. For instance, I've always had trouble with sleeves and I suspected my shoulder angle was the problem.

So, when a couple of my friends decided to go to a class to make personalized duct tape dress forms, I was IN! We donned an old t-shirt and started wrapping each other starting with a criss-cross and filling in with smaller, 3-inch pieces around the "round" parts, then covering all this again and yet again before slitting the whole thing up the back, taping it back together and stuffing it.

It's sort of ridiculous-looking but, can you see why I've had trouble with sleeves? First, my right shoulder is lower than my left and when I put this over my dress form at home, the edges of my shoulders were a full INCH wider than the form I'd been using all these years! My shoulders are more square too so I'll have to pad them higher on my form. Now, I can't wait to make some clothing!

I titled my 'words' quilt "Hyphen Comma Hashtag". When I went to my favorite quilt shop (Thimble Creek in Concord CA) to get opinions on how I should border and bind it, they all said I SHOULDN'T add borders, that it would take away from the 'modern' look of the quilt, that I should just bind it, as is, with one of the gray fabrics in the quilt. Well, you don't have to tell me twice not to add to a quilt, not to make it any larger so it's more difficult to quilt on my domestic machine!

I'm going to have to wait for the fabric I've chosen for the backing to come in. It's so perfect for this quilt! It's Windham fabric's "Type". What do you think?

 Go see what other creative people have on Judy's Design Wall Monday blog!


Sunday, April 28, 2013

Getting There

I've finished all the words and have sewed a frame around them all and am filling in the rows with color blocks. I'm almost done sewing the words together into rows and will surely be able to get the top done by the end of the week--finally have a pretty empty week!

Although I don't have a good photo of it, I attended a class today in El Cerrito that the Spindles and Flyers Spinning Guild put on teaching us to make a duct tape dress form. We donned a close-fitting t-shirt and started wrapping the tape around us fitting it closely to every contour of our bodies. The 'bumps' and 'valleys' needed small pieces of tape and I probably tore or cut 150 pieces for mine. Because we needed to make the form quite thick to be sturdy, we each used 2 whole rolls of duct tape for the process! With the great patterns of fun duck tape available now, I used pink and purple!

At the end, we cut the whole thing, t-shirt and all, up the center back and will tape it back together and stuff them for use in making future garments. Can't wait!

Take a look at Judy's 
blog see what everyone else has on their design walls!

Sunday, April 21, 2013

This Word Quilt is FUN!

I've been very busy this week flying to L.A. on quilting business, making a presentation closer to home and teaching a class all day Saturday so I haven't started anything new. That doesn't mean I'm not quilting.
    Yes, I'm still working on the "word" quilt! I'm telling you, Tonya Ricucci's "Word Play Quilts" book (see here) is such a fun way to put fabric together! If you think about it, quilting is usually very precise: measure this, cut that, sew this, all VERY exacting. But making letters by this method and turning them into words of totally freeing and I'm loving it!

I'm up to 16 words now with only 2 to go (poem and screenplay). I'll put them them on my design wall and get them arranged the way I want them then I plan to put 'frames' around each word and somehow construct a quilt top. I'll show you the process the whole way!

Come back week to Judy's Design Wall Monday and you'll see my next step.

Sunday, April 14, 2013

More Words

    My design wall looks vaguely similar to last weeks, right? I actually added 3 more fun words: Hashtag ("spelled" with a pound sign instead of an "h" which I thought was rather clever), Asterisk (which is pretty hard to see here but better in person) and Exclamation Point. These words are so fun to create and I'm really looking forward to making more! My list includes: Ampersand, Apostrophe, Period, Paragraph, Parenthesis and Slash. I'd love more ideas if you have a suggestion.
     Take a look at what everyone else has on Judy's blog!


Sunday, April 7, 2013

Words On Quilts

My design wall has three little words on it. They may seem odd but I can explain: I've always loved quilts with words on them so when I saw this book, "Word Play Quilts" by Tonya Ricucci, I just had to buy it. Her method is totally free-style, no measuring, no dimentions. It's not at all like any quilting I've ever done and it took me a little while to get used to it but it was totally freeing and I LOVED it!

So, about the words: I recently bought a fat quarter tower of Moda's new "Comma" line. I love the colors but the real reason I bought it is, it's perfect for a quilt for my daughter and her wife. They're both writers so the asterisks, commas, dots and swirls on the fabric will be perfect. I'm going to make about 20 words that have to do with writing such as comma, dash and hyphen (the last also happens to be their cat's name) with period, semi-colon, paragraph and others to come. 

The book suggests making each letter individually then put them together. After they're all done and you've arranged them on your design wall, you put a fabric 'frame' around all the blocks and put the quilt together. I'm looking forward to making more of these fun blocks and I'm sure this quilt will be a big hit when I give it to them for Christmas!

See what everyone else has on their design walls on Judy's blog!

Monday, April 1, 2013

I'm Late!

Oh, darn! I totally forgot it was Monday! I'll dash this off quickly and see if anyone takes note.

I wanted to add another class to my teaching repertoire and decided to use selvages that we used to thrown away. Don't we all have hundreds of yards of selvages clinging to the edges of the fabrics in our stash?

Whenever I travel, I have 6 cords I need to take with me that get all tangled and I wanted an organizer for them. In this fold-up case, there are slots for my cell phone charger (one for the wall and one for my car), my camera battery, my Kindle charger, the cord to download my photos from my camera to my computer  and my husband's electric shaver charger! I also created a pattern for a protective case for an e-Reader or i-Pad--aren't they colorful!

What's on your wall today? Check out all the other projects on Judy's blog!

Sunday, March 17, 2013

Luck O' the Irish, etc.

I follow several hand-picked blogs and look forward to reading them, some every day! A couple of weeks ago, I was reading one of my favorites, "Kim's Big Quilting Adventure" and she had a great shamrock pattern on it. I drafted it out in a size I need for the little quilt hanger I have on my front door and whipped it up in no time. Finally I have an appropriate St. Patrick's Day embellishment in my foyer! This is about 19" square and was actually up for 10 days before St. P's Day yesterday!


       I have a new favorite ruler, the Omnigrid 8 1/2" x 24". It's huge and not easily transportable but when I put it down on my fabric to cut long strips, it stays put! Unlike my 6" x 24" which always seems to jimmy around at the end no matter how tightly I hold it. I didn't have any secure, padded container to put it in to take it on my recent retreat so I created a pattern and made one--softly but surely padded, complete with a handle. Know what? it's also perfect for my newly purchased yoga mat!! (That's Tippy our #2 kitty).

And speaking of my retreat (loads of fun with Thimble Creek Quilt Shop to Murphy's California a couple of weeks ago) this is one of the projects I worked on. The pattern is "Peppermint Wreaths" by Bonnie Sullivan but I wouldn't recommend it as it doesn't give you a CLUE as to how to put all those 1" squares together--just an illustration and the rest is up to you. VERY difficult to piece as there are no obvious sets of 'blocks' to put together and in many places I had to "Y" seam a single 1" square--blagh!

    This is the 26" table-topper version and there's a tree-skirt exactly the same pattern only much larger--an no easier to piece!
     I've just finished quilting the center and green parts with the off white edges remaining. Then I'll cut it around the edges to form a 26" circle (also no CLUE in the pattern as to how to manage that!) and bind it in red.
     Seems it's the pinning of a quilt that's always the point where I put it aside and start on another project. I find small pieces like the 3 on this page, where I can pin them on my cutting table rather than struggle to find a large area to pin, they actually get finished! Could it be I'll have this one done months before I need it at Christmas-time?

     Check out the other design walls on Judy's blog today!

Sunday, March 3, 2013

Retreat Time!

I spent the best time at a 4-day quilting retreat in the Gold Country of Northern California last weekend with 20 other quilters! No teachers, nothing scheduled, just bring your own projects and sew for 3 1/2 days! It's the first time I've attended this retreat and I went by myself not knowing any of the other quilters when I arrived. But, like all quilting retreats, by the time I left, I'd made delightful new friends!

I brought several projects including a Christmas table-topper pattern, a top to pin and quilt, a paper-pieced NY beauty-type quilt with many tiny components, fabric for blocks I need to make for a community service project in May and this, a BOM from last year called "Rotogravure". I finished these blocks each month right on schedule and LOVE them! Each block has an intricate, 6" block INSIDE the pumpkins and the checkerboard finished at 1" squares so precise piecing was essential! The quilt was designed by Joe Wood, owner of Thimble Creek Quilt Shop in Concord, CA the shop who put on this fabulous retreat. I highly recommend their delightful "Thimble Creek Gazette" blog posted every Tuesday morning. You can sign up to receive it here.

In subsequent Design Wall Mondays, I'll show you the progress of the other projects I brought on this wonderful retreat. Thanks for the opportunity, Judy!

Sunday, February 17, 2013

Design Wall--Round Robin Finish! (repost)


I'm reposting this entry to Judy's DWM which I failed to do last week. . . .

Have you ever been in a Round Robin? As I told you a few weeks ago in this post I was in one with 7 other ladies at a quilt shop, Thimble Creek, in Concord Calif. We each made a center block and 4 borders would be added by 4 other quilters in the group. We actually chose the quilt we wanted to work on each month rather than everyone working on everyone else's quilt which is normally how Round Robins work.

I am absolutely ecstatic with my finished top! My center block was inspired by the wonderful Freddy Moran who I saw speak at a nearby quilt guild recently. I told the other quilters that I wanted a small quilt with bright colors and black and white, just like Freddy does it! This quilt measures 38" square which is perfect for the spot I have earmarked for it in our foyer.

These quilters really know what they're doing don't they?! See that final border? I actually wanted to stop after the white polka dot border just before it because I didn't think anyone could add anything to enhance the quilt. Boy was I wrong! And you know who pieced the last border? Sandy Klop of American Jane fame! She's a delightful lady, so cheerful and friendly!

Take a look at this other quilt, the one I finished for another member of the group. Like it?

Check out what everyone else has posted on Judy's  design wall


Monday, January 28, 2013

Charles Todd Books

A Test of Wills: The First Inspector Ian Rutledge Mystery (Inspector Ian Rutledge Mysteries)
I love the idea that Judy at PatchworkTimes.com is starting a "Whacha Readin' Tuesday" linkup. Here's my first!

When my husband and I are in the car together, I read to him. I'm sort of like the audio book! While I'm more apt to read a 'chick book' and he's into Civil War history, finding a book we both enjoy is a bit more difficult.

We happened upon a series of books by Charles Todd, a pseudonym for a mother/son collaboration who write wonderful 'who-done-it' books set in post WW I England, an era of history neither of us knew much about.

Ian Rutledge, a detective with Scotland Yard, has returned from the awful trenches of this war with shell-shock he tries to hide, and is trying to get his life back together by taking projects no one else wants. The descriptions of the villages in the English countryside, the memories and nightmares of the bloody battles and the ghosts who haunt Rutledges's head all add to the excellent writing of these clever books. We're reading our 5th Ian Rutledge book at the moment!

I highly recommend "A Test of Wills" the first of the series of Ian Rutledge books.

Friday, January 25, 2013

On My Needles

This is my first post on Judy Laquidara's "Patchwork Times" website under this theme. Why? Because I'm a quilter, not a knitter. At least until last week! I took the plunge (and Judy's challenge) and tried knitting a sock and had such success, I'm already certain I'm hooked on knitting socks!

So, I finished one sock and am on the second. . . only thing is, I'm going to run out of yarn that I probably bought 5 years ago. Since this was only going to be a 'learning' sock, I'm fine with the fact that the final 1/3 of the second sock will not match the first one--LOL!

Question for all you experienced knitters: I used thicker-than-sock-weight yarn with #3 DP needles for this pair casting on 40 stitches which was perfect. Now I want to try a sock weight yarn with #1 needles for the next pair. How do I figure out how many stitches to cast on and follow the great Staci Perry pattern I used? If I end up casting on 60 stitches for example, do I just increase each stitch number in the instructions like I would if I was increasing recipe ingredients? Thanks in advance for your help!

Wednesday, January 23, 2013

My Very First SOCK!!

Thank you, thank you, THANK YOU Judy Laquidara! After reading dozens of your enthusiastic blog posts where you're knitting or talking about knitting socks, your recent one suggesting that if we want to learn to knit them, we should just get in there and TRY, I finally did it! I Googled "knitting socks on double-point needles" and found a you-tube series by Staci Perry at verypink.com. After finding suitable yarn and needles in a stash of yarn WAY bigger than I ever thought I owned, (I've knitted a lot of scarves!) I was on my way.

The videos were so easy to understand and wonderfully filmed. After printing out the pdf pattern, I sat and knitted for hours! I actually finished one whole sock and was so proud of myself! And I only took a couple of small breaks. . .

. . .  and that's where the problem lies. Only I could injure myself while knitting! I woke up the next morning with a painful knot under my right shoulder blade that rendered me useless for the whole day. My compassionate husband heated the 'rice pack' over and over for me, ran me a hot bath and forced me not to knit or sew all day. I wanted to finish that other sock so badly but he was right, I needed to take a long rest.

It's now 2 days later and my knot is about 90% gone so I tried to knit for an hour this afternoon. Bad idea. I've made an appointment for a massage. . . and promised my husband I'd lay off the obsessive behavior for several days.

But isn't it CUTE?!

Sunday, January 20, 2013

Another Round Robin

First you need to know I did not make this quilt. This is a Round Robin-- a center block and 3 'rounds' have been put on it, so far. My job is to come up with the 4th and final 'round'.

The original center block was put on point and the red triangles and applique flowers were added. Then the wonderful, multi-colored braid was applied, then came  that very difficult and effective diamond border. Now it's my turn.

I'm thinking there needs to be something black in the center of each border (maybe an appliqued blackbird?) with the some of the red at the corners (which I have very little of) and maybe a multi-colored pattern in between (squares?) or should it be a single fabric in between?

I wish I had more of the fabrics that were used in the previous borders but I don't and I hate to use just 'same-colored' fabric. The center of the original block is an Australian print which I have some of and maybe that will just be some of the multi-colored addition.

What would YOU add to finish this quilt? Your suggestions would be appreciated.

I wonder if Judy has ever been part of a round-robin :-) Check out her blog to see